Falcon Build Update #4 Tailgate Drama
Ford Falcon Wagon Tailgate
I should have called this “The Good, The Bad and the Ugly” as I update everyone on the MyRideisMe.com 1963 Falcon Wagon build. It no doubt I drastically underestimated the work needed to get ready for paint! Also, my plan for the Falcon changed from a quick paint job to, “I might as well do it right” which of course is the right way to go. I’ve made some good progress on the body work even though Arizona’s held 100-plus degrees making it damn hot in the garage. It’ll be another 20 days before it cools down, so waiting’s not an option. Damn! I’m writing about the weather!

Want the good, the bad or the ugly? OK, bad first. Remember the blog when I showed off my skills filling the back-up lights in the tailgate. Please disregard everything I said! I screwed up that tailgate beyond reasonable repair, at least for me. Luckily, I have Mr. Freeze, (my buddy Rob) backing me up with another tailgate on hand (and rust free!).
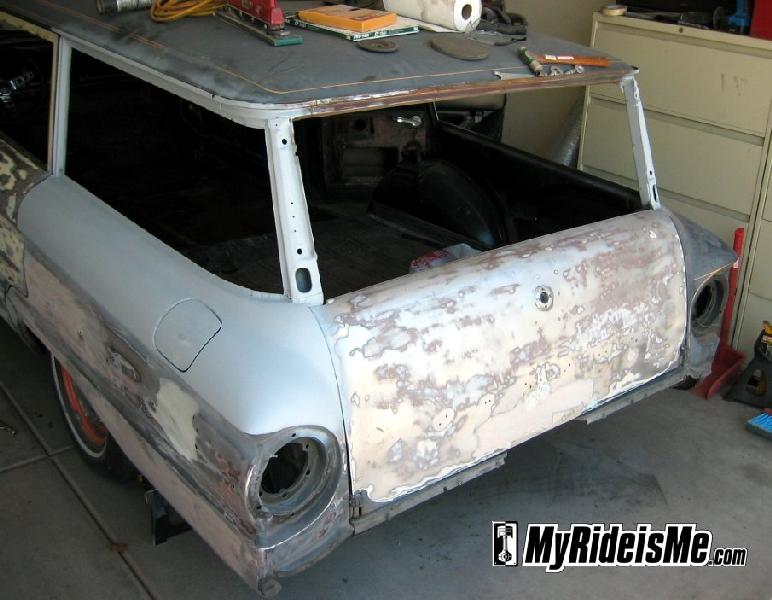
The original tailgate was repaired (another big pile of manure the previous owner didn’t mention) and had some pretty thick filler in it, so it’s just as well. This big pic shows the tailgate after I filled the backup lights and the Falcon trim piece above the window crank. Then, here comes the ugly, somehow it warped so bad, I couldn’t believe it! The filler required to make it straight was unreal! I ground it all off just to show how bad it warped. Those red arrows show the 1/4″ of gap. (click on the picture to see it bigger) Bad times. I decided to punt.
I want to know what the heck happened, so for that, I went back to Doug Jerger from Squeeg’s Kustom. I can’t say how lucky I am to have a professional painter like Doug available to help. He’s already been a big help and doesn’t make me feel like a dumbass for asking simple questions. Doug said that when you weld up a hole like the backup lights, the panel will warp no matter how careful you are with heat. The trick is to manage the warp as you go. Not sure how to do that yet, when I figure that out, I’ll pass it on. (Any advice to add? Leave a comment please)

Call me a sellout, but for the next tailgate, I’m keeping the backup lights and I’m gonna use that Falcon trim piece too! [By the way, did you know that wagon’s and Ranchero’s use the same tailgate? Makes sense, right?] By looking at the new tailgate, you’d say I’m lucky, and I am, but that’s not the original paint, so this piece too had a few hidden treasures. This tailgate became my mission. If I can’t get this thing straight, I better punt on the bodywork all together!
The good: I did it. Here’s some things I learned making this tailgate straight. I wish I had planned better, or you might say, “I wish I knew what the hell I’m doing!” Moving forward, I’ll apply all these lessons to the hood I started on and the rest of the car.
What I learned: Bodywork 101 continued..
Mixing and applying body filler in Arizona’s heat is tough. I even tryed putting the filler into the refrigerator before I start working. Not sure if that’s helping. Maybe. I’m constantly battling – Not enough hardener vs. Kicking too quickly. Alot of that has to do with my filler spreading skill. I’m slow and sloppy. I’ve pretty much decided to mix fairly small batches of filler and apply it several times. It sucks for productivity, but it’s better then throwing away a huge batch of filler cause it’s kicked. Also, once it does start to firm up, quit spreading. It’ll be a mess, believe me! (learned the hard way)


Next, I started out chasing dings and dents in the tailgate. I think this might be an OK way to start, but at some point, as Doug said, you have to apply a thin coat of filler over the entire panel. Otherwise, you make new low spots filling in other dents near spots you already filled. Makes sense now! In these two pictures, you can see the dent filling and then the full cover I did. I also used some guide coat so I knew where the low spots were as I sanded. The goal is no black spots showing low and now bare metal poking through as high. (Actually “high” usually means there’s low near by) You might say there’s alot of filler on there, but not really. It’s on thin and after sanding, it’s almost see through in most places.
Make sure to clean out any trim holes unless you can reach them from the back. Doug told me after spreading to clean out all the holes then drag the spreader around all edges to clean them up too. You want to let the filler go over the sides a little. The tailgate was low right next to the edge, almost all the way around. If you wait until the filler gets hard, you’ll need to sand it off cause I found that trying to break it off will make it chip off where you need it. Bummer.

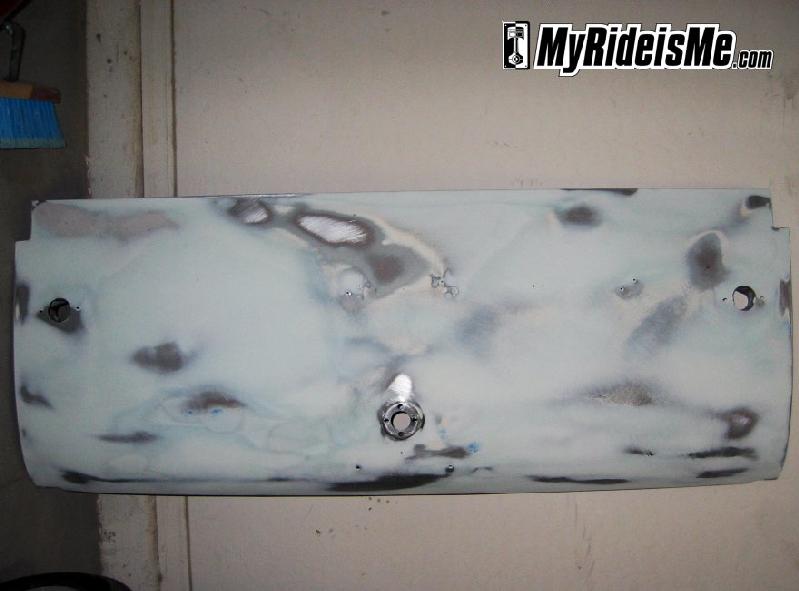
Finding high or low spots has really been tough for me. I guess some people feel better with their strong hand and some with their off hand. Really? I think I’m learning, but it’s tough. To check a panel, hold your fingers tightly together, then I run my hand across the panel fairly quickly. I also look away from the panel so I’m not distracted by the color variations from several coats of filler. If you feel anything (vague enough?) there’s probably something wrong. This is a pic of the tailgate ready for primer.
Then finally, the order of your work is important. I want to use Squeeg’s primer because it’s does not shrink like other production primers and offers the best rust protection. Looking back, I would have followed this plan: 1) Strip paint (either by sanding or preferably media blasting) down to metal or the original primer. 2) Paint 2-3 coats of Squeeg’s primer, then 3) Do the bodywork on top of the primer – this is another advantage of Squeeg’s primer. But, before I asked Doug, I started doing bodywork. So, I’ll follow this plan: 1) Same as above – strip paint, 2) do bodywork, especially the roughest parts, 3) shoot 4-5 coats of primer. Then, for both plans, that’s all followed by tons of block sanding to get it totally straight.
I better quit here before I start sounding like I know what I’m doing! I do feel like I’m getting better. Last weekend, I spoke many words kids shouldn’t hear and I felt like I’d never get this done. Now, I’m optimistic.
In closing, one more bit of wisdom… Doug Jerger asked me, “So how much time do you have in that tailgate?” I said, “Damn, I don’t know, alot!” He then said, “That’s why a paint job costs so much.” I get it now. To get a perfect paint job like the ones he does, you need high quality people and alot of labor. There’s no shortcuts.
Every story I’ve written about this build can be found here: 1963 Ford Falcon Wagon Build
Thanks to my current sponsors:
- Heat and sound insulation from Auto Insulation
- A great new steering wheel, a stock one from Cesar at Vintique Inc.
- Doug Jerger and Squeeg’s Kustoms for the Epoxy Primer Filler
More sponsor opportunities available!


Props to you for taking on this project. Your account of how you went about the tailgate fix is good reading. A guy can learn from it. Thanks for the post!
too bad you didnt put that much time and care in to the car you traded for that wagon! say what you will about the body work and the primer, but at least that car got me everywhere i needed to go, which is more than i can say about the p.o.s you traded for it! WORST TRADE EVER!!!!! AND I WILL REGRET IT FOR AS LONG AS I LIVE!!!! quarter panels full of bondo! a motor that nearly fell apart after a few hundred miles! and a tranny that no longer shifts correctly WORST TRADE EVER!!!!!! but lesson learned i guess.
Grimm is the previous owner of this Falcon. He’s commenting on the, “another big pile of manure the previous owner didn’t mention” I put in this blog. I’m shocked by this response. I think he should have been thanking me!
That’s right! I only commented on his workmanship, not his character. Had I attacked his character, I would have mentioned how in addition to the car, he also agreed to do about $1000 worth of body work. He flat-out FLAKED on that cause he’s bitter over the condition of the Fairlane. I know I told him everything I knew about the Fairlane and he even admitted that to me. I know that’s not true for him. Case in point: the MESS he left when cutting out the cowl vent. There was never any mention of that. Talk about filled with bondo! He’s the one claiming to be a body man and he’s angry with me cause he didn’t notice the condition of the Fairlane’s quarter panels? Does that make any sense at all?
The lesson for everyone to learn is: Never hand over the title until the deal is done.
craig thanks for the wheel you really help me out rob car looks killer now painted them red looks ton better
i have a 1962 falcon squire wagon, i think you made a killer choice. granted it has been a labor of love… well a pain in the ass but the final project is quite satisfying. ive done a full air ride setup w/ air horns. ground up motor build, etc
havent started bodywork not as brave as you. lol
Don’t know if it’s brave or stupid… I might have to punt and pay someone to finish the bodywork if I ever want to drive the Falcon! Best of luck on your project!